Your best friend for file transfer.
 Fetch
Fetch
 Fetch Help > Windows > New Connection Dialog
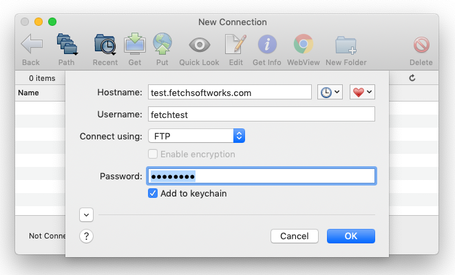
The New Connection dialog is where you tell Fetch which server you want to transfer files from or to.
This is a detailed description of the New Connection dialog; for a quick guide, see the New Connection dialog introduction help topic.
Normally Fetch displays the New Connection dialog automatically when you start Fetch. You can show it at other times by choosing File > New Connection .
You can disable the automatic display of the New Connection dialog by unchecking the Show New Connection dialog at startup preference in the General Preferences pane.
The dialog requests the following information from you:
- Hostname: the name or IP address of the server you want to transfer files from or to
- Username: the name of your account on that server
- Connect using: how you're going to connect to the server (usually FTP or SFTP)
- Password: the password for your account
The hostname of the server is required. If the username is left blank, the special username "anonymous" will be sent to the server (but not displayed). This indicates you want anonymous (guest) access to an FTP site. When connecting anonymously it is not necessary to enter a password.
If you click the disclosure ![]() button, the dialog expands to reveal additional fields. A complete description of each field is below.
button, the dialog expands to reveal additional fields. A complete description of each field is below.
If you're not sure what information to enter in the New Connection dialog, see the What do I enter in the hostname, username, and password fields? help topic.
Note: The information entered in the New Connection dialog has nothing to do with your license to use Fetch. It specifies the server with which you'd like to transfer files. The people who operate the server you are trying to connect to (such as your Internet service provider or hosting provider) should provide you with the information you need to connect to their FTP server, SFTP server, or web server.
You can also fill out some or all of these fields by choosing a recent connection from the Recent Connections ![]() pop-up or a shortcut from the Shortcuts
pop-up or a shortcut from the Shortcuts ![]() pop-up menu. You can create your own shortcut by filling out the fields in the New Connection dialog, and then choosing Make Shortcut from the Shortcuts pop-up menu. You will be prompted for a name to give the shortcut, and whether it should be the default shortcut. After you connect, the shortcut will be created and appear in the Shortcuts pop-up menu and in the Fetch Shortcuts window. See the creating a shortcut topic for other ways to create shortcuts in Fetch.
pop-up menu. You can create your own shortcut by filling out the fields in the New Connection dialog, and then choosing Make Shortcut from the Shortcuts pop-up menu. You will be prompted for a name to give the shortcut, and whether it should be the default shortcut. After you connect, the shortcut will be created and appear in the Shortcuts pop-up menu and in the Fetch Shortcuts window. See the creating a shortcut topic for other ways to create shortcuts in Fetch.
You can specify a shortcut as the default shortcut; the New Connection dialog will always open with information from the default shortcut already filled out. You can set a default shortcut using the Default shortcut preference in the General Preferences pane. You can also create a new default shortcut in the New Connection dialog by filling in the desired information, choosing Make Shortcut from the Shortcuts pop-up menu, and checking the Make this the default shortcut box.
You can cycle through the shortcuts by pressing Command-] or Command-[ . You can cycle through the recent connections while in the dialog by pressing Command-Option-] or Command-Option-[ .
The dialog supports smart pasting of Fetch addresses (FTP URLs). If you paste a Fetch address, it will be broken into parts and the parts placed in the appropriate fields. If you've set up WebView for a server, you can also paste web addresses (HTTP URLs) for that server and Fetch will fill out the dialog appropriately.
The information requested by the dialog is:
Hostname - The Internet address of the server to connect to, for example "ftp.fetchsoftworks.com". You can also enter an IP address (for example "216.92.39.106").
Username - The username of the account to connect with, if necessary. If you are connecting to an anonymous FTP server, you do not need to enter a username.
Connect using - The type of connection you want to use to access the server. The choices are FTP (no security), SFTP, and FTP with TLS/SSL (FTPS). Not all servers support all these choices; be sure the server you're connecting to supports your choice, or you will receive an error. See the connection types and security help topics for more information about these choices. Fetch remembers your last choice from this menu for the next time you use the New Connection dialog; this is handy if you always use the same connection type.
Enable Encryption - Whether to connect to the server using encryption to protect your data transfers or not. This checkbox only applies to FTP with TLS/SSL connections. You cannot encrypt data when using plain FTP connections, and encryption is always enabled for SFTP connections. See the Security help topic for more information.
Password - The password for your account on the server, if necessary. If you are connecting to an anonymous FTP server, you do not need to enter a password. If you have previously saved the password for this account in your keychain, this field will be automatically filled out.
Add to keychain - When this checkbox is checked, Fetch will securely save the password for the specified server and username in your keychain for future use, so that you do not have to enter it again. For more information, see the Keychain support help topic.
Click the disclosure ![]() button to see these additional fields:
button to see these additional fields:
Initial folder - If you enter a folder name or a path to a folder on the server, Fetch will automatically go to that folder when you open the connection. If left blank, Fetch will take you to your home folder on the server.
Port - If the server uses a non-standard TCP port for connections, enter that port number here. Enter 990 to use SSL connect (Implict SSL) instead of AUTH TLS when connecting with FTP with TLS/SSL. Typically you leave this field blank.
Try to connect … times - If you'd like Fetch to repeatedly try to connect to a busy server, you can specify the number of times to retry in this field.