Your best friend for file transfer.
 Fetch
Fetch
 Fetch Help > Windows > Info Window Introduction
Info windows display detailed information about remote files and folders. You can also rename items, and set permissions and transfer options for files.

To display an info window, select an item (or items) in a file list and choose Remote > Get Info.
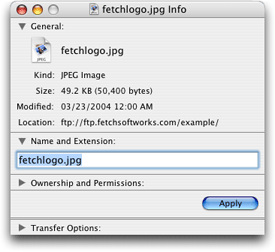
Info windows are divided into several panes: General, Name and Extension, Ownership and Permissions, and Transfer Options. You can hide and show each pane by clicking the disclosure triangle to the left of its name.
The General pane shows the selected item's icon, kind, size, modification date, and location. If you selected multiple items, it shows the number of files and folders selected. If you selected a folder, or multiple items that include a folder, there is a button to calculate the size of all of the selected items (since calculating the size of folders can be time consuming, Fetch does not do it automatically).
To change a file or folder's name or extension, edit the field in the Name and Extension pane, then click the Apply button.
The Ownership and Permissions pane shows who has access to read (view) and write (modify) the selected items. To change the items' permissions, check or uncheck the checkboxes, then click the Apply button. You can also edit the permissions using the UNIX equivalent edit field. For more information about interpreting and changing permissions, see the permissions and viewing and setting permissions help topics.
To discard any changes to the name or permissions, just close the info window without clicking the Apply button.
The Transfer Options pane lets you tell Fetch how it should download a file, and what it should do with it afterwards — such as whether to automatically open or decode files, or which application will be used to open or edit the file. For more information, see the transfer options help topic.
The panes you see in the info window will vary depending on whether you selected a single file, a single folder, or multiple files or folders.
For more information about using the info window, see the info window in-depth help topic.
